


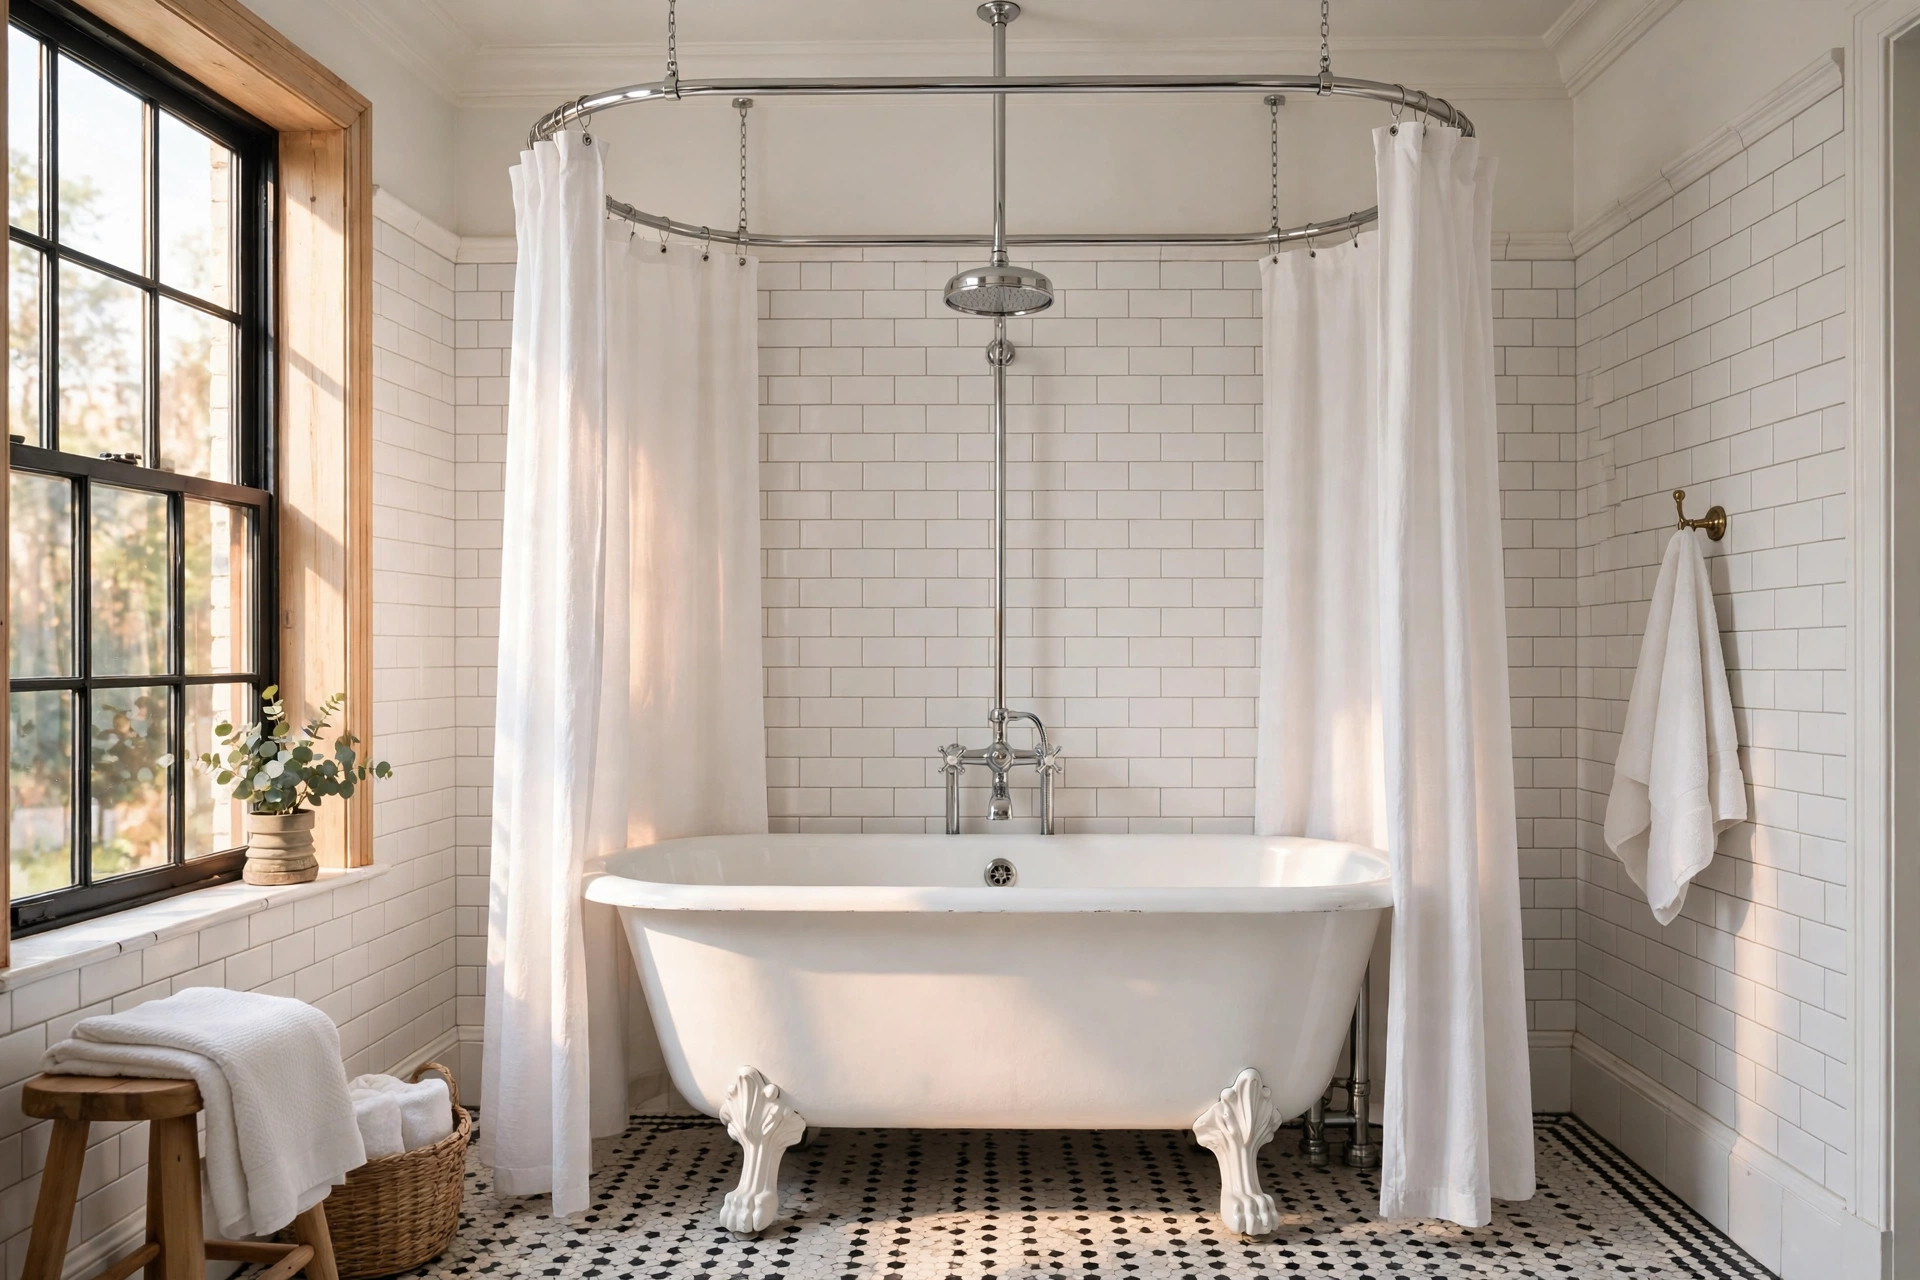
Can you put a shower in a clawfoot tub? Yes — and it’s one of the most popular upgrades in vintage bathrooms. A freestanding clawfoot tub looks romantic, but most of us need a daily shower too. The good news is that converting a clawfoot tub for showering is a well-solved problem: a vertical riser pipe, an overhead or handheld shower, and a wraparound curtain ring turn your soaker into a fully functional shower. Here’s everything you need to know, from parts to plumbing to costs.
How a clawfoot tub shower works
Unlike an alcove tub, a clawfoot tub stands free in the room with finished sides all around. A shower setup has three parts:
- The riser — a vertical pipe (usually chrome or brass, about 60–72 inches tall) that rises from the tub’s faucet and carries water up to shower height.
- The shower head — either a fixed overhead head on a short arm at the top of the riser, or a handheld shower on a sliding bracket (or both, with a diverter).
- The curtain ring — an oval or D-shaped ring suspended from the ceiling by supports, holding a wraparound shower curtain that keeps water inside the tub.
Water drains through the tub’s existing drain — no new drain plumbing needed. That’s the beauty of it: the tub itself is the shower pan.
What you’ll need: parts and costs
A complete add-on shower kit for a clawfoot tub typically includes the riser pipe, shower head, handheld wand, diverter, curtain ring with ceiling supports, and a curtain. Here’s what to budget in USD:
- Basic chrome shower conversion kit: $150–$300. Includes riser, single overhead shower head, oval curtain ring, and supports. Perfectly functional.
- Deluxe kit with handheld wand and diverter: $300–$600. Adds a telephone-style handheld shower on a cradle — my recommended setup, since handhelds make rinsing and cleaning the tub far easier.
- Solid brass or oil-rubbed bronze kits: $500–$900+. Premium finishes for a high-end look.
- Shower curtain (extra-long): $20–$50. You need a wraparound curtain, usually 72 × 72 inches or larger, in vinyl, PEVA, or fabric with a liner.
- Professional installation: $200–$500 if you’re not comfortable with plumbing connections.
Most kits are designed to connect to a standard 3⅜-inch tub faucet — measure your faucet’s spread before ordering.
Installation: the step-by-step
1. Check your faucet. You need a tub filler with a shower diverter, or you’ll add an add-a-shower diverter spout. If your clawfoot tub has only a simple filler with no hand-shower port, plan to replace the faucet with a gooseneck tub filler with diverter ($100–$300).
2. Mount the riser. The riser pipe typically threads onto the faucet body or mounts to the tub rim with a support bracket. It must be plumb (perfectly vertical) — a leaning riser looks terrible and stresses the connections.
3. Hang the curtain ring. The oval ring (usually about 54 × 26 inches for a standard 60-inch tub) hangs from the ceiling on 2–4 support rods. Mark your ceiling joists first — the ring plus a wet curtain is heavier than it looks. Ceiling height matters: you need at least 7 feet for comfortable clearance, and the ring should sit about 72–75 inches off the floor.
4. Connect the shower head and test. Attach the overhead head or handheld, run the water, and check every joint for leaks before you button everything up. Use thread tape on all connections.
5. Hang the curtain. The curtain should hang inside the tub rim by several inches and puddle slightly against the tub’s inner wall when wet — that’s what keeps water off your floor.
Freestanding vs. wall-adjacent tubs
If your clawfoot tub sits against a wall, you have a simpler option: a wall-mounted shower arm and a straight curtain rod or L-shaped rod anchored to the wall. This is sturdier than a ceiling-hung ring and costs less. The full 360° curtain ring is only necessary for tubs that truly stand in the middle of the room.
The honest downsides
- Water containment is the eternal challenge. Even with a good curtain, enthusiastic showers splash. A heavyweight curtain and a slightly smaller ring help.
- Heat loss: an open tub shower in a drafty bathroom cools faster than an enclosed stall. A bathroom heat lamp ($40–$80) is a worthwhile companion.
- Cleaning: you’re now cleaning the tub’s exterior too, since it’s visible. Chrome polish becomes part of your routine.
- Ceiling support: in bathrooms with very high or sloped ceilings, hanging the ring gets complicated — consider the wall-adjacent option instead.
Frequently asked questions
Can you put a shower in a clawfoot tub without drilling?
Yes — most conversion kits are entirely add-on: the riser clamps to the faucet or tub rim, and the curtain ring hangs from ceiling-mounted supports (which do need small ceiling anchors, but no tub drilling).
Does a clawfoot tub shower need a plumber?
A handy homeowner can usually install a kit in 2–4 hours with basic tools. Call a plumber if you need to replace the faucet, move supply lines, or if your drain is slow — a shower dumps water faster than a bath drains.
How much does it cost to add a shower to a clawfoot tub?
DIY with a mid-range kit: $200–$400 all in. With a new gooseneck faucet and professional installation: $600–$1,200.
So can you put a shower in a clawfoot tub? Absolutely — it’s a weekend project that makes a beautiful vintage fixture genuinely practical for everyday life. Choose a kit with a handheld wand, hang that curtain ring into solid joists, and you’ll wonder why you ever thought you had to choose between romance and a proper shower.

GIPHY App Key not set. Please check settings